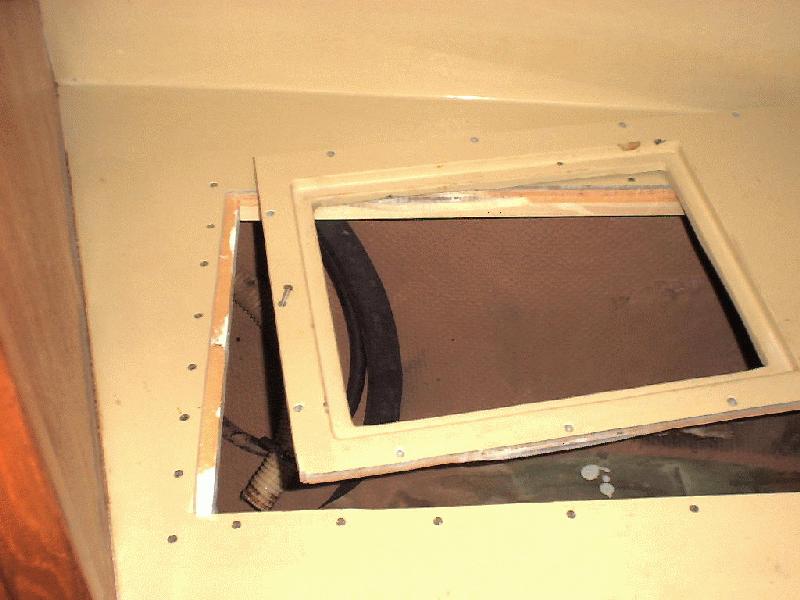
 Enlarging the V-berth access hole.
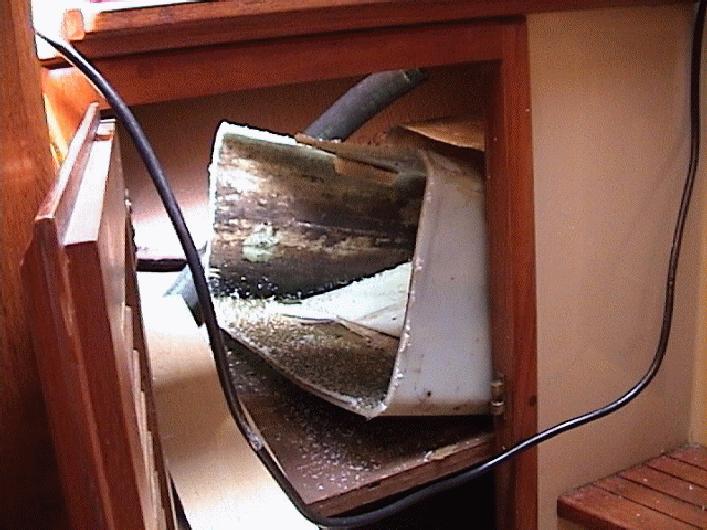 Taking out the tank in pieces.
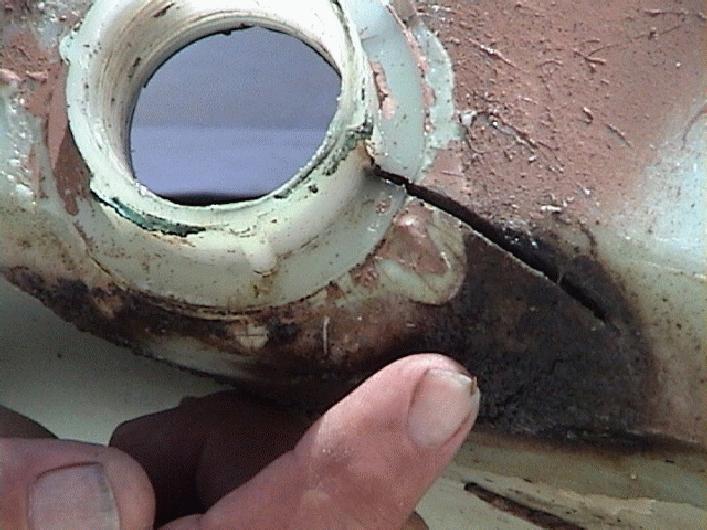 Tank crack - the source of all evil!
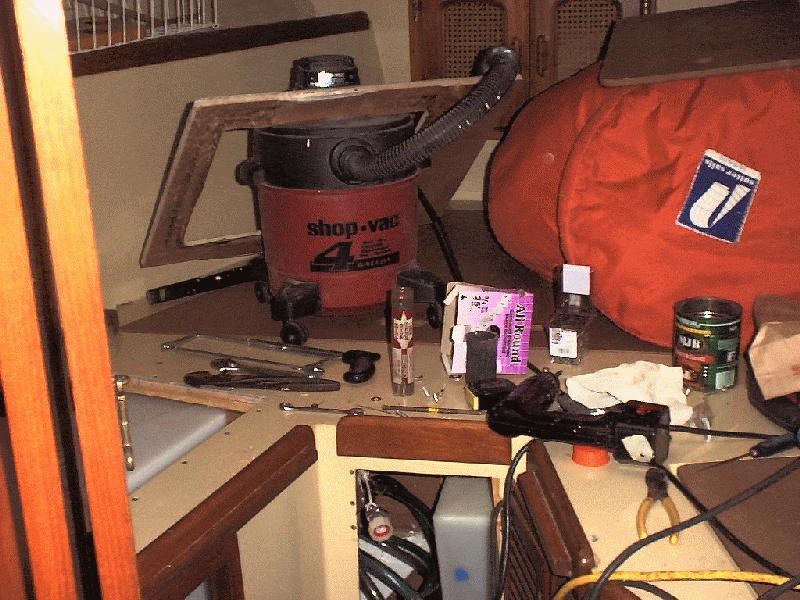 These projects aren't neat.
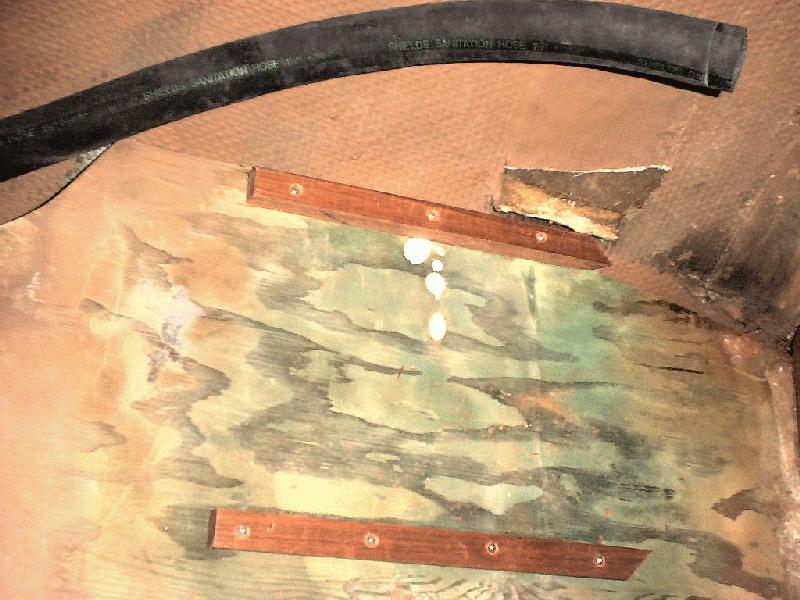 Blocking for new tank.
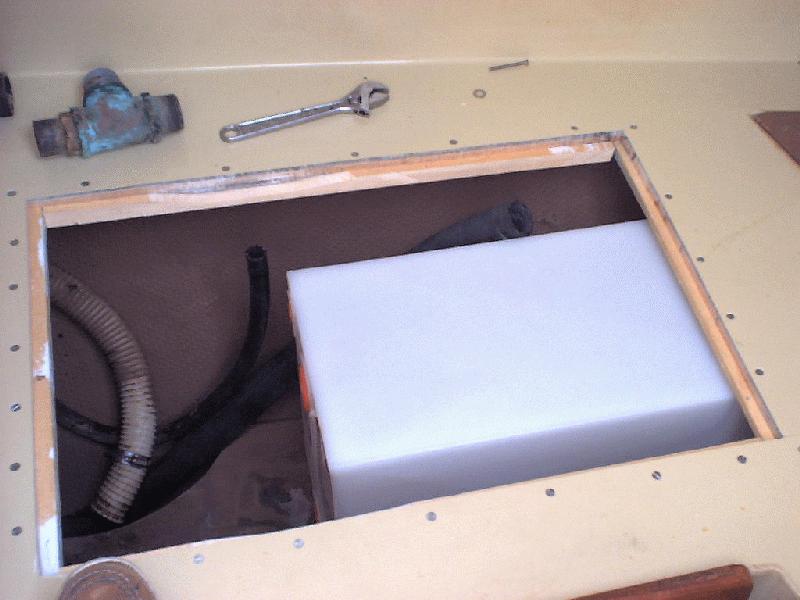 New tank going in.
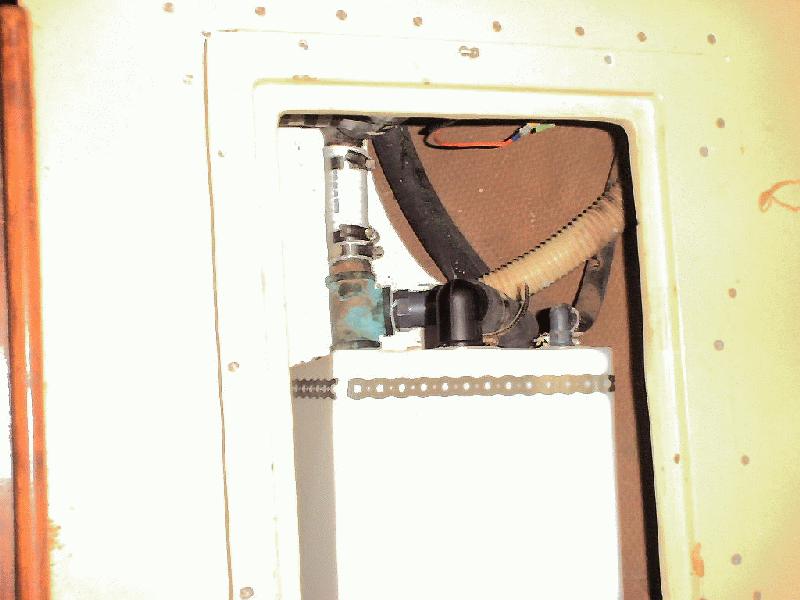
 All strapped in.
 Finished with bunk cutout replaced.
Holding Tanks & Replacements
----- Original Message -----
From: "Charles Stephens" <
Subject: Holding Tank Replacement (See finished project pictures at the bottom of this page.)
Maybe someone has advice. I have reached that dreaded point where the holding tank is leaking. Taku is a 1978 boat. the tank is original and obviously was installed before the bunk was put together.
Has anyone done a replacement and if so how did you go about it? Looks like a saw is needed. Any help would be appreciated.
Thanks
Charles Stephens
Taku III
Replies:
Charles-
I have a 1976 I36 -- and replaced the holding tank about 7 years ago. There are, I think several ways to do it. One is to cut through the V-bunk base (on mine, the original opening was fiberglassed over, so provides something of a template for cutting). I did it another way -- removed the cabinetry (drawer assembly) on the port side by pulling the plugs. It comes out easily. Disadvantage is that it limits the size of the holding tank you can install. I believe the max. I could "squirrel-in" was either 10 or 15 gallons. It was mounted to the rear of the V-berth step assembly using heavy duty webbing via four bolds thru holes drilled from the cabin side just above the steps. My boat has a 3rd water tank under the V-berth which is immediately to the rear of the "new" holding tank -- so that inherently limited holding tank capacity space vs Islanders that have only the 2 port & starboard water tank configuration.
Good luck
Don Henderson
"Kindred Spirits"
------------------------------------------
Charles,
I'm not sure where your holding tank is - I've got a 1973 I-36 that I put a holding tank in myself in 1979. I put it under the port V-berth, just forward of the head. On my boat there is an access hatch under the bunk that I had to enlarge just slightly to slip the tank in - I think it's about a 5 or 6 gallon tank. I fiberglassed a 2x4 to the hull for the outer edge to rest on, and bolted a piece on the inner side, then added plumbers tape (the metal strapping with the holes in it often used to secure hot water tanks) to hold it in place.
Rick Van Mell
--------------------------------------------
Charles...
Yes, you will need a saw.....
1st. determine how big a hole you will need to get the old tank out the new tank back in,
2. Drill a pilot hole and cut out the hole w/ a sabre saw. Keep the piece you cut out as you will be putting it back in.
3. Using 1"x2" douglas fir strips, attach them around the sides of the opening, half of the 2" dimension under the existing part of the bunk, thru bolt with 1/4" flat head bolts @ +/- 6"oc.
4. Then lay the "hole" piece back in and screw this piece back down w/ #10 or #12 flat head screws.
I had to do this when I installed an "Electra-San" unit under the port side of the bunk. I then removed the holding tank entirely...
You might look into this possibility....This way you are not dependent on a pumpout station!!!
If this isn't clear send me your PO & I'll send you a drawing....
Hope this helps....
Skipper wall
"Snowflower" 73, #154
-------------------------------------------------
Charles,
Although I have a '78 Islander Freeport 36 rather than the regular Islander 36, I went through the same process about a year ago.
First, I measured carefully and bought a new roto-molded tank from Ronco Plastics in southern California. They have a huge catalog of existing sizes, and chances are you will find a pre-existing size that will fit. For just a few extra dollars, they put the fittings in the new tank exactly where I needed them, which really helped. A 30-gallon tank, with proper fittings, delivered to my house, was under $150 as I recall--a real bargain as far as I'm concerned.
The tank was installed under the bunk also, and could not be removed intact withouth removing a major structural bulkhead, which I didn't want to do.
I flushed the tank repeatedly and even ran some vinegar or Chlorox through it, as I recall. I then attacked it with a SawzAll, basically cutting the tank in half. The smell was not as bad as I expected...almost more chemical than "outhouse." But some sludge did escape, which entailed the use of a lot of Simple Green and PineSol.
Before installing the new tank, I filled it with water out on the dock to make sure the fittings were all sealed tightly. Turns out the output fitting (at the bottom of course) was leaking and needed to be re-sealed, so I am really glad I tested it first!
Finally, I bought that very expensive Trident brand sewage hose for the output run from the toilet to the tank, and from the tank to the pumpout. Forget the high cost, it's worth it. After over a year, there is NO head smell inside the boat. That hose is real stiff and I found that to get it over the barbed fittings, I had to carefully heat it with either a hair dryer or a heat gun to soften it up a bit.
I think those are all my words of wisdom. Good luck!
Regards,
Mike Bennett
Islander Freeport 36 "Getaway"
San Francisco
--------------------------------------
Charles,
My tank was replaced with a diesel fuel bladder. This is a flexible, very strong container that resembles a balloon. So far so good.
----------- The Results -------------
Well I did it, and today finished putting in the tank!
To start with I want to thank all of you who sent suggestions. Now I will tell you what I did. Taku had the holding tank on the port side under the V berth. The tank was original as it had marking from the factory that said ISLA.
I used Skipper Walls suggestion and cut out the hole and then put in fir
1X2 strips through bolted to the bunk to accept the part we cut out. I would
suggest that you use #8 flat head bolts and nuts and #10 washers to hold the
strips in place. I put way too many wood screws in the "hole" piece. I
realized this when I dropped the plywood hatch in its hole and it has no
screws. I think 4 screws are enough. The bunk deck is quite strong, 1/2 inch
ply with maybe 3/16 glass on it.
The old tank had a two inch split near the bottom outlet tube and had been
weeping for quite some time.
I went to West marine and bought a Todd 13 gal holding tank 24"x10"w x 14'
h. This tank fit under the bunk with 1/4 inch to spare. I have gained some
storage space.
We installed blocks to hold the bottom in place and two blocks to hold the
top forward end fastening them to the fir strips that hold the "Hole" in
place. On the aft end of the tank I ran a strip on galvanized plumbers tape
from the bottom outside over the top to the bottom inside and screwed it in
place.
After hooking up the macerator all is working fine.
Thanks again to those who sent helpful e-mail's
Charles Stephens
chstephens@dccnet.com
Taku III
Click on images to enlarge, click "Back" to return.
|
Return to Maintenance Menu Return to Main Menu |